INSTRUCTIONS FOR REGISTERING FOR ENGLISH AND IT TESTS
(LATEST VERSION)
Effective from December 29, 2025, the test registration system now supports automatic ID data extraction and photo verification between the 3×4 ID photo and the identification document.
- Required documents
- A 3x4 ID photo file, size between 10KB–500KB, with resolution 354 × 472 pixels, in JPG or JPEG format, compliant with the ID photo requirements. See details HERE
- Photos of the front and back of the test taker’s ID document (ID/Citizen ID card/Passport/Birth Certificate with Verification Letter – for test takers not yet eligible for an ID card/Citizen ID). The photo must be well-cropped, showing complete and clear information, and be between 10KB–2MB
- Valid ID documents as specified by IIG Vietnam. See details HERE
- Steps for online registration
Step 1: Log in to the system
- Access the registration portal: https://registration.iigvietnam.com/
- Enter the test taker’s username and password, then select Log in.
- If the test taker does not have an account, select Register and follow the instructions.
Step 2: Identity verification
For new accounts that have not been verified, the system will display a popup requiring test takers to select the type of ID document used for registration.
- Select ID document

- If the test taker uses an ID/Citizen ID card for identity verification, please upload photos of both the front and back sides of the ID as required

- If the test taker uses a Passport for identity verification, please select the country of issuance first.
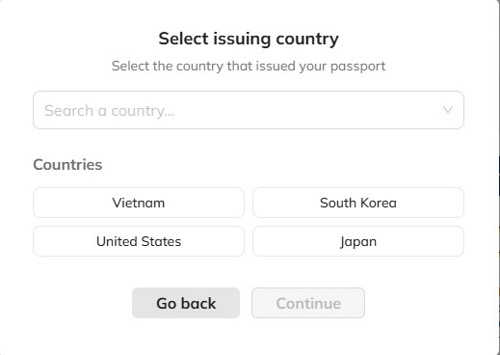
Then, capture and upload a photo of the passport’s personal information page to the system.

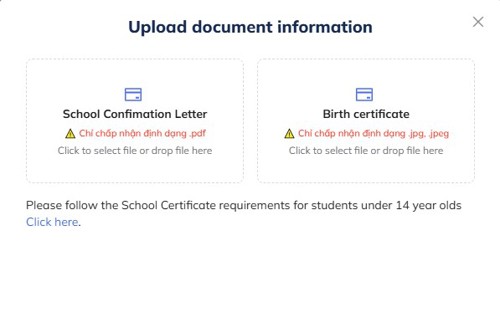
- If the test taker wishes to use other documents, please upload the Verification Letter issued by the school and a photo of the Birth Certificate, then complete all required personal information.
- Upload ID photo
Please upload the valid ID photo and adjust the photo so that the test taker’s face fits within the dotted frame.

The system will automatically review the 3×4 ID photo to ensure it meets the required standards. In case the photo does not comply, a pop-up notification will appear with the relevant error message. At this step, test takers can

-
- Choose [Re-upload]: Upload a new ID photo
- Or choose [Continue]: Confirm using the current photo as the 3×4 ID photo
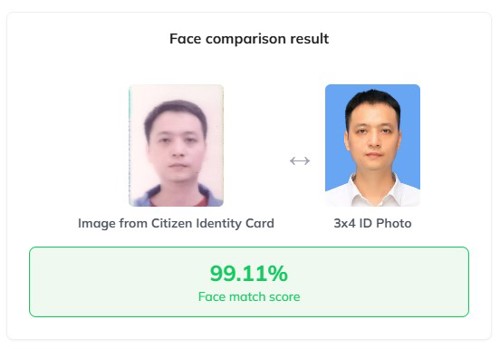
Once both the ID document photos and the 3×4 ID photo have been successfully uploaded, the system will extract personal information from the ID document and compare the document photo with the 3×4 photo to check for similarity.
If verification fails, the system will display a detailed explanation of the issue for the test taker to review and edit the information accordingly
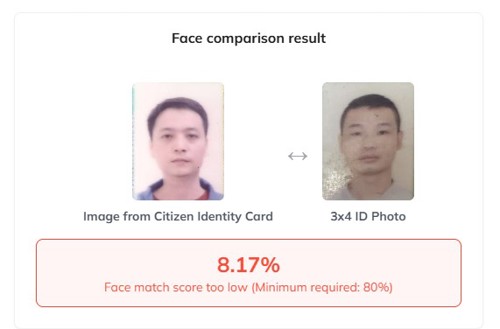
Please review the message and upload a valid 3×4 ID photo or ID document as required.
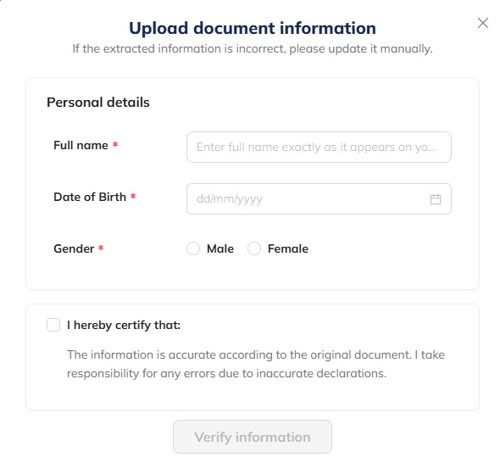
If verification is successful, the extracted information from the ID/Citizen ID card will be displayed. Please review the details carefully. At this step, test takers may edit the ID number, full name, date of birth, and gender if the extracted information does not exactly match the test taker’s ID document.
- Confirmation
Once the test taker has reviewed and verified that all personal information is correct, please click “I hereby confirm” and select Confirm Information. The system will then automatically populate this information into the Test Registration section.
*Notes:
- In case the system fails to extract personal information from the ID document more than five consecutive times, the test taker will be required to enter their personal information manually on the final attempt. The identity verification function will then be temporarily locked for 15 minutes.
- In case the system successfully extracts personal information but the face-matching process fails more than five consecutive times, the identity verification function will be temporarily locked for 15 minutes, and manual information entry will not be permitted.
Step 3: Enter Personal Information and Select the Test
For accounts with verified information, the system will automatically pre-fill the test taker’s details on the registration form.
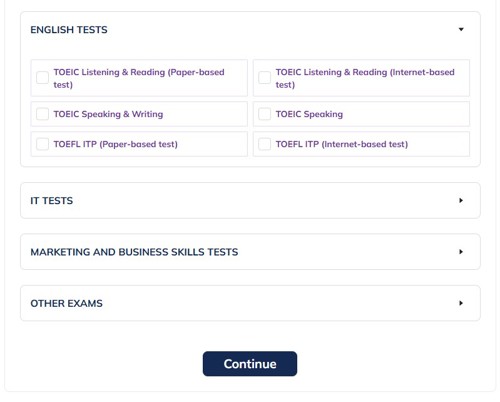
Test takers enter their contact information and select the test(s) they wish to register for. Test takers may select multiple tests within a single registration.
Step 4: Select Test Registration Details
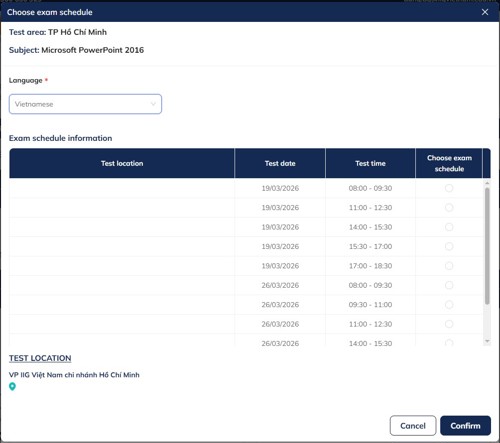
Click [Select Test Schedule] to choose a test date for the selected test. Next, select the Region. The system will then display a list of available test schedules for the chosen region, allowing test takers to select and register accordingly.

For IT tests: Test takers must select a test schedule for each certification exam (multiple certification exams may be registered under one test version ).
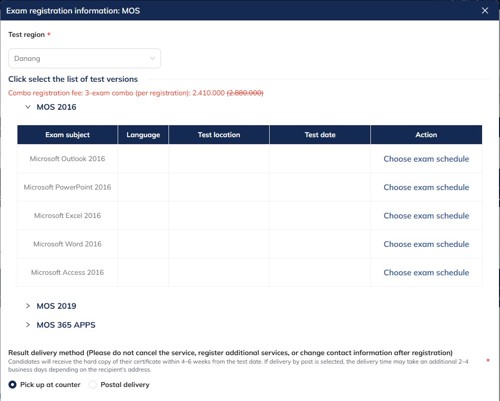
Click [Choose exam Schedule] to choose a suitable date for each certification exam.
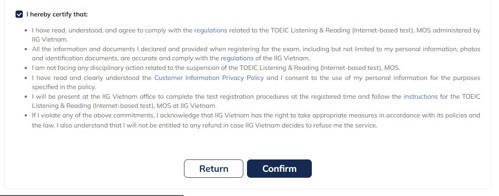
Notes: Please read the information carefully and check the box “I hereby confirm” to confirm that you have read, understood, and agree to comply with all test regulations and guidelines.
Step 5: Confirmation and Payment
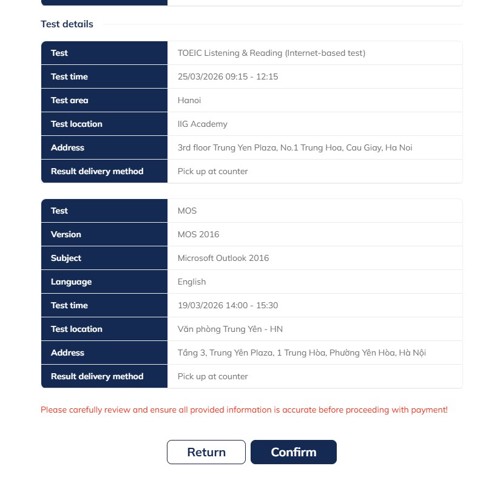
Test takers review their registration details carefully and click [Confirm] to confirm the test registration.
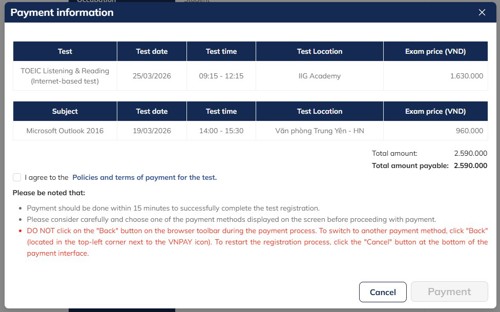
If the test taker would like to apply a valid promotion code, enter the code in the [Enter promo code] field and select Use. The system will then display promotion details for confirmation. Please read the promotion requirements carefully and provide all required information as instructed to complete the application of the promotion code.
Then, review the information again and check the box “I agree to the Payment Terms and Conditions.”
Step 6: Select payment method and complete payment
Choose either VNPAY or MBPAY as a payment method.
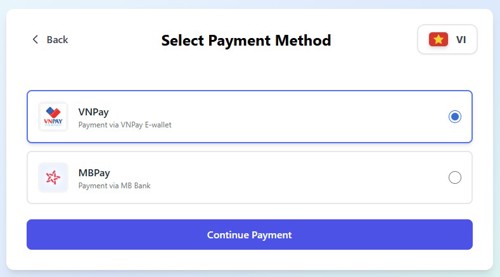
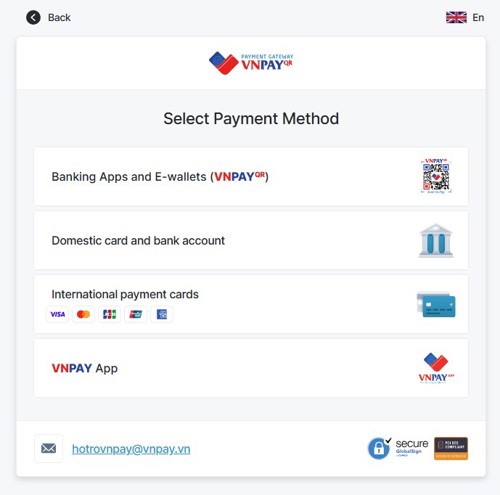
VNPAY supports the following payment options: QR code payment, domestic bank cards and bank accounts, international payment cards, and the VNPAY e-wallet.
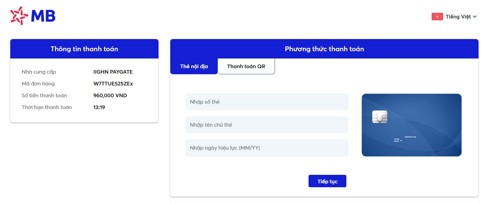
MBPAY supports payment via QR code or domestic bank cards.
Notes:
- Please complete the “Pay now” step within 15 minutes. Exceeding this time limit, the system will not reserve your slot, and you will need to restart the test registration process.
- Carefully read and select one of the following payment methods: QR code payment, domestic bank cards and bank accounts, international payment cards, or the VNPAY e-wallet.
- During the payment process, DO NOT click the “Back” button on your web browser. To switch to another payment method, click “Back” (at the top left of the payment screen, above the VNPAY logo). To cancel and restart the registration process, select “Cancel” at the bottom of the payment screen.
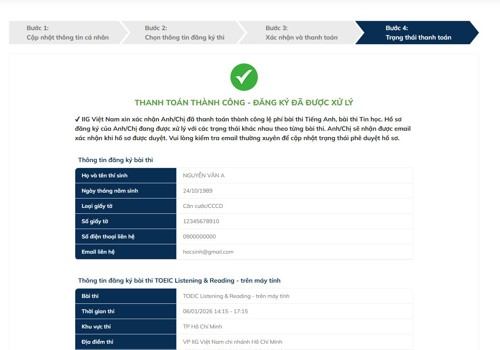
Step 7: Registration Confirmation
After payment is completed successfully, the registration portal will display your payment details and test registration information. Please review all information carefully to ensure accuracy.
Step 8: Await Approval from IIG Vietnam
After completing payment, tesk takers will receive a notification email from the test registration system. Please note that this email does not yet confirm successful test registration. IIG Vietnam will review and approve your registration application. The review, approval, and notification of registration results will be completed no later than five (05) working days before the test date.
- Important Notes
Please read all test regulations and guidelines carefully to ensure full understanding of all test-related requirements.
- Customer Support
For further assistance, please contact us via e-mail: info@iigvietnam.edu.vn or hotline: 1900 636 929 (Monday–Saturday: 8:00–12:00; Monday–Friday: 13:30–17:30)
We wish all test takers excellent results in the test!
IIG Vietnam